Over the past couple of months, member Jeffrey Crews has been slowly refurbishing an old Gibson Epiphone guitar that showed up at the Space.
“It was missing the pickups, nut, mounting plate for the output jack, all wiring, and rear electronics cover.
However, the body was in ok condition and the neck was straight. Since I had rebuilt a Fender-style electric guitar in the (distant) past, and recently rebuilt an electric bass, I decided to fix up this one, only this time with a minimum of purchased parts.
I had to purchase the bridge and tailpiece (to which the strings attach) from Ebay for $20 because my machining skills are nowhere near up to that challenge. I designed and printed the electronics cover, nut, knobs, and jack mounting plate.
I also decided to take the plunge and build a set of 2 “Humbucker” pickups instead of buying them.
A little background: a guitar pickup uses a coil of thousands of windings of very fine wire on a plastic “bobbin,” on which are also mounted strong magnets. The steel strings, which are also in the circuit, vibrate when plucked, and this vibration causes a fluctuation in what would otherwise be a stable magnetic field. The coil turns this fluctuating magnetic field into an electrical signal.
The coil might also pick up the 60Hz signal that all of our electrical systems are continuously broadcasting; a “Humbucker” pickup uses two paired coils that are wound oppositely to each other so that the two 60 Hz signals will be out of phase and cancel each other out. The magnets on the two coils are also reversed in polarity, so that the actual “string” signals from the two bobbins are NOT out of phase.
The above is a very, very simplified and fudged explanation; pickups are something of a Dark Art and there’s way more information on the Internet that you’d ever want to read about them.
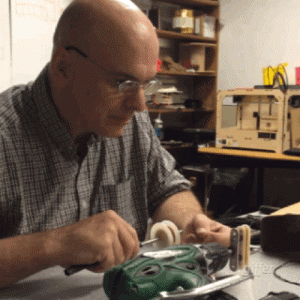
Splatspace has a 3D printer and also some large coils of fine (~45 ga) enameled wire, so I designed and printed 4 bobbins and a jig to hold the bobbins in an electric drill. I used a small clamp to precisely adjust the drill’s speed so that I didn’t snap the wire.
First I re-wound small spools of wire from the giant 10 pound reel
then wound each bobbin.
I didn’t count the windings; some of the original Gibson technicians said that they used “as many as it would hold,” so I didn’t sweat it. Pickups have to be “potted”- infiltrated with wax or plastic so that the coil windings themselves don’t vibrate or move around. Since I printed these bobbins in ABS, I just trickled ABS glue (ABS dissolved in acetone) into the windings until they felt hard.
Humbucker #1 uses common rare earth magnets I bought from Banggood.
The 6 “slugs” which penetrate through the bobbin are just pieces of steel bolts.
Humbucker #2 will use strong ceramic magnets. Hopefully these two completed Humbuckers will have somewhat different characteristics so that the usual pickup-selector switch can select for different sounds.
Here’s the first completed bobbin.
Since then I have completed the second bobbin, and assembled and tested the first completed Humbucker. It works!
Up next: printing out the casing which will hold the completed Humbucker and allow for spring-mounting inside the body. I might also print out a thin pickup cover for each pickup since they’re kind of ugly. This style of guitar didn’t originally have a pickguard, but I might cut one out of brass sheet and electrolytically etch it. More on that later.”


