


Arduino’s are the Swiss Army knife if nerds and hardware hackers. They’re extremely versatile, and this article is going to show you a little hack on how to make them even more versatile. Here’s the problem: the most widely used Arduino is the Arduino Uno and by default it does not have the ability to emulate a keyboard or inject keystrokes. This ability is reserved for the Arduino Leonardo, which is an extra purchase. So here’s how you can convert an Arduino Uno into a keyboard emulator. This guide is based on a similar write up by Kevin DeMarco.
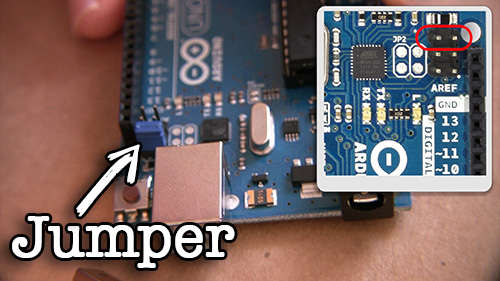
- Take the Arduino Uno and place a jumper (like the ones you find on old hard drives) on the Reset and Ground pins as shown in the picture to the left.
- Plug the Arduino into your computer via USB wait a few seconds (for the lights to flash on) and then remove the jumper. This puts the Arduino in reset mode.
- Now on your computer (assuming linux), open up a terminal and run these commands
- Update apt-get
sudo apt-get update
- Install the DFU program
sudo apt-get install dfu-programmer
- Download and unzip the firmware we’ll need for this project. This zip file contains two hex files: Arduino-keyboard-0.3.hex and Arduino-usbserial-uno.hex
wget http://www.tinkernut.com/demos/arduino_hid/arduino_hid.zip
unzip arduino_hid.zip
- Use the DFU programmer to erase the chip, upload a new firmware, and reset the chip. For this example, we will just upload an Atmega16u2 version of the USB firmware.
sudo dfu-programmer atmega16u2 erase
sudo dfu-programmer atmega16u2 flash --debug 1 Arduino-usbserial-uno.hex
sudo dfu-programmer atmega16u2 reset
- With the new firmware uploaded, you now have to power-cycle the Arduino. You can do this by simply unplugging it and plugging it back in.
- We now know how to flash the firmware, so now we need to make it act like a keyboard. So the first thing we need to do is write a simple program for the Arduino that sends keystrokes to the serial console. How we send a keystroke? By using this list of HID keyboard codes to find the character you want to send. Below is the sample code provided by Kevin DeMarco/* Arduino USB HID Keyboard Demo
* Random Key/Random Delay
*/
uint8_t buf[8] = {
0 }; /* Keyboard report buffer */void setup()
{
Serial.begin(9600);
randomSeed(analogRead(0));
delay(200);
}void loop()
{
delay(5000);buf[0] = 0;
buf[2] = 0x15; // letter R
Serial.write(buf, 8);
releaseKey();
}void releaseKey()
{
buf[0] = 0;
buf[2] = 0;
Serial.write(buf, 8); // Release key
} - Check this code for errors and then upload it to the Arduino. Now all that’s left to do is follow the same steps as in steps 2 and 3 to upload the Arduino Keyboard firmware. Briefly, here are the steps:
- Unplug the Arduino from the computer
- Place the hard drive jumper on the Ground and Reset pins.
- Plug the Arduino back into the computer so that it powers on
- Remove the hard drive jumper
- In your computer terminal, execute these commands to upload the Arduino Keyboard firmware
sudo dfu-programmer atmega16u2 erase sudo dfu-programmer atmega16u2 flash --debug 1 Arduino-keyboard-0.3.hex sudo dfu-programmer atmega16u2 reset - Power cycle the Arduino by unplugging it and plugging it back in.
- With your Arduino reconnected, open up a text editor, and you should see the letter “R” being typed (or whichever letter you chose). You’ve successfully emulated a keyboard with your Arduino!
- Update apt-get